Lab 2a: Introduction to Kubernetes
In this lab, you will learn about Kubernetes and its networking model. We will use Minikube to setup a Kubernetes cluster on your computer.
Info
Kubernetes is a complex software with a large number of configurations and resources. For the sake of this lab, we will only make use of the resources discussed in class. If you want to learn more about Kubernetes model and resources, a good way to start is to read the documentation.
Installing Minikube
You can install Minikube following this guide.
Tip
We suggest to use the docker driver for MacOS and Linux; Hyper-V for Windows. In any case the Virtualbox driver should work in any OS.
Starting Minikube
Once Minikube is installed, you can start your Kubernetes cluster with the following command:
This command will download the necessary Kubernetes components and start a single-node cluster with Calico as the CNI.Info
try to pass the --nodes=3 argument to minikube if you have a powerful laptop. This command will generate a 3 nodes cluster (think about each node as a VM).
A correct output should look like:
😄  minikube v1.32.0 on Darwin 15.1.1
🎉  minikube 1.35.0 is available! Download it: https://github.com/kubernetes/minikube/releases/tag/v1.35.0
💡  To disable this notice, run: 'minikube config set WantUpdateNotification false'

✨  Using the docker driver based on existing profile
👍  Starting control plane node minikube in cluster minikube
🚜  Pulling base image ...
🤷  docker "minikube" container is missing, will recreate.
🔥  Creating docker container (CPUs=2, Memory=4000MB) ...
🐳  Preparing Kubernetes v1.28.3 on Docker 24.0.7 ...
    ▪ Generating certificates and keys ...
    ▪ Booting up control plane ...
    ▪ Configuring RBAC rules ...
🔗  Configuring Calico (Container Networking Interface) ...
    ▪ Using image gcr.io/k8s-minikube/storage-provisioner:v5
🔎  Verifying Kubernetes components...
🌟  Enabled addons: storage-provisioner, default-storageclass
🏄  Done! kubectl is now configured to use "minikube" cluster and "default" namespace by default
Interacting with Your Cluster
You can interact with your Minikube cluster using kubectl. For example, to get the status of your nodes, you can run:
Since we have only one node, the output should show only have one entry:You can also see which Pods are running in the cluster by running:
A correct output should look like:
NAMESPACE     NAME                                       READY   STATUS    RESTARTS       AGE
kube-system   calico-kube-controllers-558d465845-fj4vf   1/1     Running   2 (13d ago)    13d
kube-system   calico-node-v94c9                          1/1     Running   1 (13d ago)    13d
kube-system   coredns-5dd5756b68-bqnks                   1/1     Running   4 (13d ago)    13d
kube-system   etcd-minikube                              1/1     Running   1 (13d ago)    13d
kube-system   kube-apiserver-minikube                    1/1     Running   1 (5m1s ago)   13d
kube-system   kube-controller-manager-minikube           1/1     Running   1 (13d ago)    13d
kube-system   kube-proxy-nf7df                           1/1     Running   1 (13d ago)    13d
kube-system   kube-scheduler-minikube                    1/1     Running   1 (13d ago)    13d
kube-system   storage-provisioner                        1/1     Running   5 (115s ago)   13d
If you like UIs
The content of this lab will mainly use the Kubernetes CLI kubectl. There are a number of projects that bring UIs to Kubernetes. If you prefer using them, we suggest headlamp.
Deploying an Application
To deploy an application, you can create a deployment file in YAML. For this example, we will deploy a Wiki server. A basic deployment (deployment.yaml) file should look like:
apiVersion: apps/v1
kind: Deployment
metadata:
  name: wikijs
  labels:
    app: wikijs
spec:
  replicas: 3
  selector:
    matchLabels:
      app: wikijs
  template:
    metadata:
      labels:
        app: wikijs
    spec:
      containers:
      - name: wikijs-container
        image: lscr.io/linuxserver/wikijs:latest
        ports:
        - containerPort: 3000
Verify the status of a deployment
You can install the application in the cluster by running:
To verify that the app is running, you can check the output of the command:
# In this case we do not specify -A because we want to know only pods in the default namespace
kubectl get pods
Tip
You will see more information if you use the -o wide option
A correct output should look like:
NAME                                READY   STATUS    RESTARTS   AGE
wikijs-5ccdc5f64c-62m9s             1/1     Running   0          57s
wikijs-5ccdc5f64c-c6bks             1/1     Running   0          57s
wikijs-5ccdc5f64c-snsh6             1/1     Running   0          57s
Expose an application via NodePort
Interacting with an application in Kubernetes inevitably requires using a Service resource. In this case we will use a NodePort service to expose the Wikijs application outside the cluster.
The corresponding service.yaml file will look like:
apiVersion: v1
kind: Service
metadata:
  name: wiki-svc
spec:
  type: NodePort
  selector:
    app: wikijs
  ports:
    - protocol: TCP
      port: 3000
      targetPort: 3000
      nodePort: 30080
Apply the service:
Warning
The following instruction is only needed for minikube as it runs as a VM or container inside your computer. It will return an URL that you will paste to your browser
Opening the service url, you should see the following website:
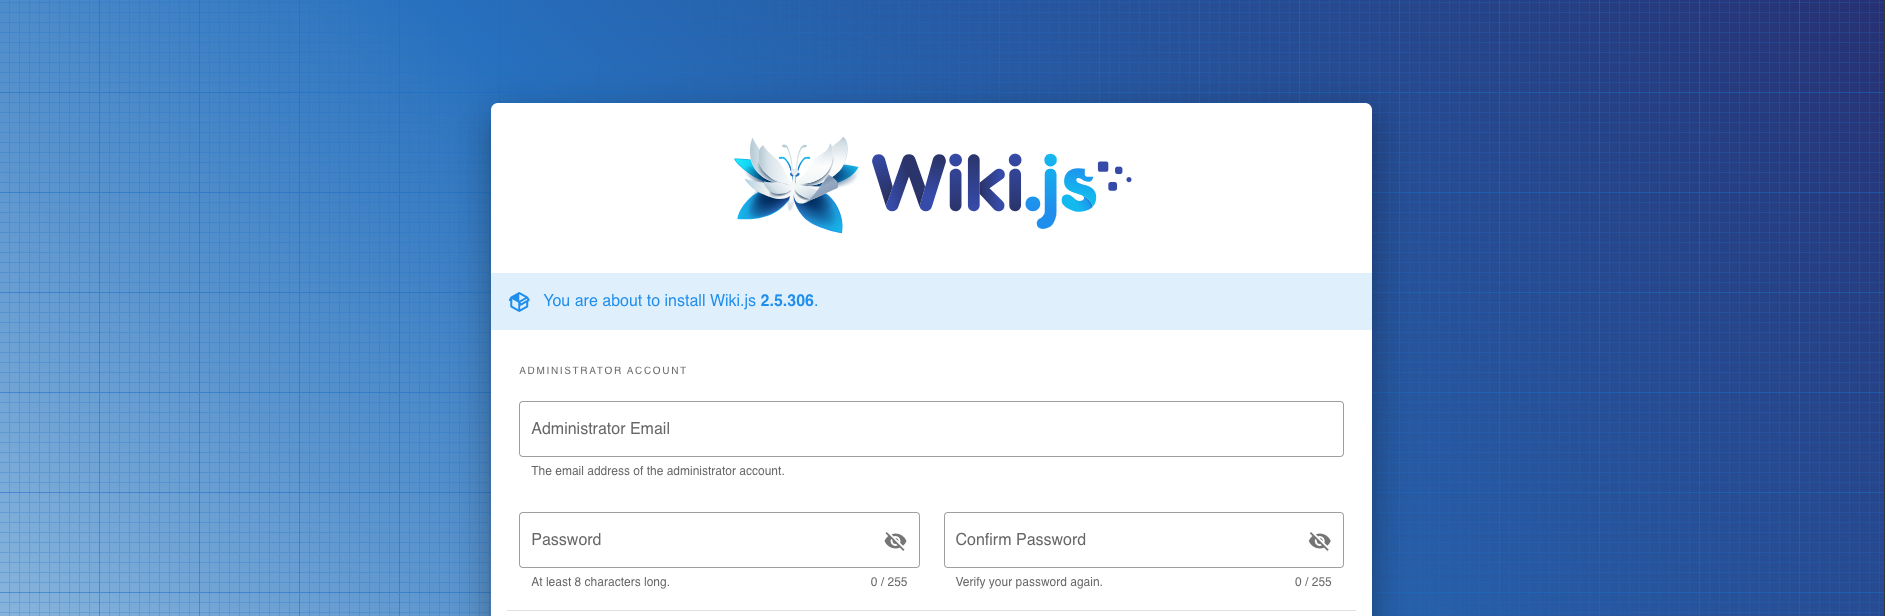
Questions 1-2
The WikiJS installation process will fail at some point, after providing the initial username and password.
- Can you find out why?
- How does a correct YAML deployment look like for this application? Provide the updated YAML file(s).
Service communication
Pods usually communicate with each other using services. Service differs for IP address and communication patterns. In this part, you will analyze how services work and how to communicate with them.
Create a Pod with network analysis tools
apiVersion: v1
kind: Pod
metadata:
  name: test-container
  labels:
    app: test
spec:
  containers:
  - name: ubuntu
    image: ubuntu:22.04
    command: ["sleep", "infinity"]
After verifying the service runs, get a shell:
Then installnslookup so that we can make DNS requests to Kubernetes:
Finally, verify the IP address of the service:
Server:     10.96.0.10
Address:    10.96.0.10#53

Name:   wiki-svc.default.svc.cluster.local
Address: 10.103.43.191
Questions 3-4
Question 3
Which Pod is acting as a DNS server in the cluster?
To which CIDR does the service IP belong?
How can you access the wiki-svc from the ubuntu container?
Question 4
Create an headless and a clusterIP service for WikiJS. Which IP addresses do each service get? Can you access them from outside the cluster?
Deleting Resources
You can clean up resources either by passing the associated declarative file:
Alternatively, you can delete all resources in the default namespace with:
This command will delete all deployments, services, pods, and other resources in the default namespace.
Warning
Be careful when using the delete all --all command as it will remove all resources in the specified namespace.
Stopping Minikube
To stop your Minikube cluster, you can run:
Deleting Minikube
To delete your Minikube cluster, you can run: